WOK IN PROGRESS - TRAVAUX EN
COURS - LAVORI IN CORSO - ARBEITSVORGANG
|
|
WOK IN PROGRESS - TRAVAUX EN
COURS - LAVORI IN CORSO - ARBEITSVORGANG
|
|
 |
|
||||||
|
||||||||
|
||||||||
|
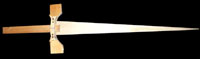
The idea
|
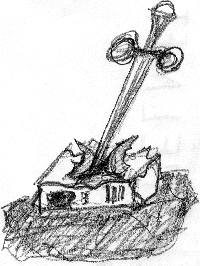 |
During the last year I dismantled a dozen computers to make the collage pieces of modern art. Some time
ago I thought that, instead of dismounting them properly, I should see
what happens when I break one with some huge hammer or pic, tear it apart
violently like an explosion. Obviously the sword should be covered and decorated with printed circuits and other electronic pieces.
|
||||||
|
|
|
|
||||||
| Execution |
 |
 |
||||||
|
First I started
cutting and assembling a wooden sword that I could decorate. I also made
a smaller rough model just to experiment on how to cut and glue printed
circuits on the wood base. |
||||||||
 |
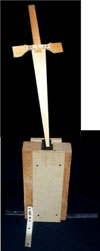
I
built a wooden support, about 30 cm high, with a hole, upholstered with
rubber sheets, to support the sword planted in it, slightly inclined.
|
 |
||||||
|
The special tools
|
||||||||
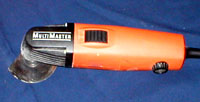 |
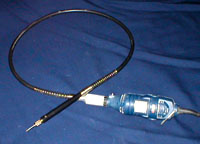
The special
saw I used is shown here - it has a very high frequency, very low amplitude
vibrating disk blade. It can cut metal, wood, and stone (with a diamond
studded disk). My friend Giovanni, the otolaryngology doctor and surgeon,
says they use the same principle to cut jawbones! I also frequently
use a handheld
rotating milling machine with diamond cutters. The cutting tool is mounted
on a flexible sheath. |
 |
||||||
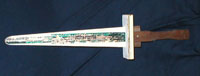
| The blade |
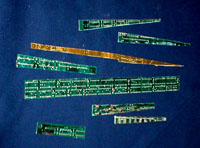 |
I
used flat printed circuits boards obtained by cutting off all the components
bonded above the surface. It was a tedious job, even with the special saw
I use. Ready to decorate, starting with the blade. I did cut long strip of circuits boards in long triangular forms so as to fit the shape of the blade. |
||||||
|
|
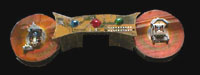
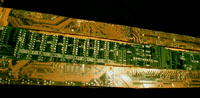
The edges of the blade are in a yellowish color and the center is in green. |
 |
||||||
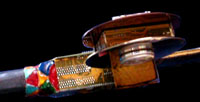
| The handel & hilt | ||||||||
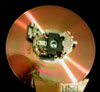 |
The
hilt is decorated all around with small pieces of printed circuits, embedded
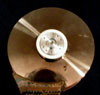
imitation semi-precious stones, and hard disks. The imitation semi-precious stones are made with transparent resin poured in liquid state in small cavities dug in the wood and colored adequately. The milling machine is used to dig these cavities. As the resin becomes solid a stain glass varnish of the adequate colour is laid over it to give it the glance. The disks were extracted from a hard disk drive. They are smaller than CD-ROM and all metal with rainbow light reflection. There are 4 such disks, 2 on each side, front and back. The fronts are decorated in the center with disks laser reading heads (left image), the back with small aluminium cylinder from the disk mechanism (right image). |
 |
||||||
|
|
 |
 |
||||||
 |
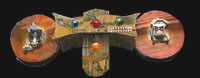
The handle
is decorated with pieces of printed circuits and embedded imitation
semi-precious stones, yellow, red, green amd blue, obtained with the
same process as described above. Click the image above or the arrow to see several enlarge views. |
 |
||||||
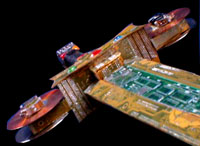
| The computer casing | ||||||||
 |
 |
 |
||||||
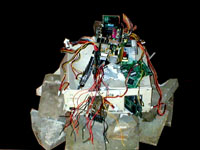 |
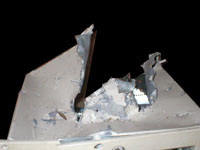
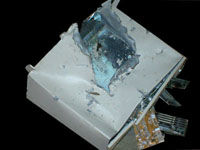
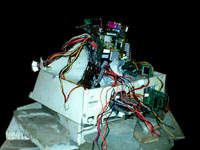
I
then started destroying a computer.
It was an old Compaq desktop, still with the metallic case. I never thought that the casing could be so thick and so hard to tear apart! Hammers would not do. I used a pickaxe, huge metal cutters and pliers, to lacerate it and to tear an opening off the center. Then I placed the wood support inside that opening and bent the metal back against it, in as much as I could. Finally I placed broken circuits boards in the various other openings so that it looked like the pressure from an internal explosion was spitting out those pieces. The whole is placed on dark grey stones like the ones used to pave the street of Siena. |
 |
||||||
 |
||||||||
| The result | ||||||||
|
|
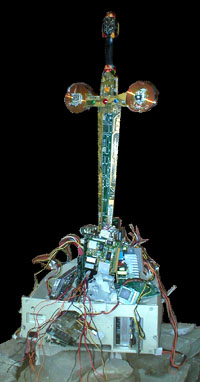 |
|
||||||